Pages

Thursday, November 5, 2015

TMC - Discover.....

Welcome to our November Challenge at The Mirror Crack'd

Our theme for the month is Water.       
Splish, splash, splosh!   
Water is such an integral part of our lives, the weather, rain, snow or storms. The landscape, the ocean, rivers and waterfalls. In our homes, cooking and cleaning. So many sports involve water, leisure and pleasure! 
 Show us your inspiration, what will you create? 
We are intrigued, will it be a scrap page, a canvas, a card, a 3D project or a tag?

Our host is Jan, and she will be choosing our Winner and Top 5.


Instead of a physical prize this month we would like to offer our Winner a Guest Designer spot for a future challenge.

 We hope our fabulous Design Team can inspire you. Please pop by their blogs and show them your appreciation!

I chose to do a canvas this month with a beach inspiration! It is my favorite place to spend days off!

So here is how I created this one:
1. I started with a flat 5X7 canvas and coated with white gesso twice for a smooth finish.

2. Using a "bubbles" rubber stamp I applied embossing ink to, I added bubbles on several areas of my canvas. I applied clear embossing powder to the canvas, shaking off the excess and then using heat tool I embossed them. Let dry.


3. Next I used various shades of blue Tim Holtz Distress inks to get the color I wanted spritzing sparingly with water to activate the distress technique.

4. I added texture with a stencil and Ranger Texture paste and spritzed with Dyllusions sprays in vibrant turquoise and Callypso Teal. Apply heat tool sparingly (just enough to raise the texture a bit)

5. While my inks and texture paste were finishing drying I took a fish cut out and applied distress inks in the same colors, coated with embossing ink and clear embossed after adhering to a thin chipboard with ModPodge transparent paste and fussy cutting. This is a technique I thought of (although I am sure it has been done) while working on this project and I really liked the result!


6. I then coated my canvas in a transparent gloss which really brings out the vibrancy of colors applied.
7. I added a stamped "Discover" with Staz-On to a piece of scruffed cardboard to the bottom, accented with sand, shells and more transparent gloss, swiped over the shells a touch with the now blue glossed paintbrush.
8. I adhered the completed fish with double stick foam pieces to the height I wanted for a more 3-d affect and then topped it with a hanger made from rope!

I hope you find this tutorial inspiring and helpful in creating your own project for this challenge!
Good Luck!


Monday, November 2, 2015

Crafty Cardmakers and More #151 Thank You

Julie is hosting today and she would like to see your Thank You creations. You might want to make a remembrance card as it's Armistice Day on 11th November, or just an old fashioned thank you card. Whatever inspires you we want to see it.


I created using kraft cardstock and colored papers and added a house mouse stamp hand water colored by me and fussy cut

Monday, October 5, 2015

CCM 149 Circular Card

Kim is hosting today and would love to see your Circular Cards


I really enjoyed creating this one! I used my Cricut machine in combination with some Sizzix dies for circular shapes. I also used stamps and dies to create the flowers and butterfly embellies.

The Mirror Crack'd October Challenge

14 - 5th October Wall Hangings or Tic, Tac, Toe


Welcome to our October Challenge.

Our theme for this month is Wall Hangings.

If you don't fancy a wall hanging we have a Tic, Tac, Toe board for you to choose from. If you want to do the wall hanging, it's the center square, then you do NOT need to do the squares either side of it, unless you fancy challenging yourself even further. Or you could pick any of the lines around the outside and miss out the wall hanging altogether. If you use the Tic, Tac, Toe, please tell us in your post which line you have used.


Our host is Lula, and she will be choosing our Winner and Top 5.

This is what I started with: It is a Flat panel 5X7 canvas that I had used a crackle effect texture paste through a stencil (TH - Flourish) random ink colors were brushed over the texture once it was dry and then a layer of clear gesso. The face is a stamp. This was such a fun project that I got caught up and forgot to take any other in between photos. I added more color on top of the gesso after dry, hair was done with hot glue and stained with brown stazon ink. The butterflies were painted with TH distress paints in Raspberry preserves and Cracked Pistachio. I then bent them in their middles just enough for the flying effect and adhered them to my canvas with hot glue. I used TH Distress Paint in Antique Linen to splatter and then Perfect Pearl mist in Perfect Pearl mostly on the butterflies. WHen everything was dry I drilled holes in top and added a bent wire for hanging.

We are thrilled to be sponsored by 

With a prize of £12.00 to spend at your favourite Woodware Stockist, either in store or on line.
 
Woodware are a Yorkshire based family owned business, as well as distributing Dreamweaver Stencils and Stampendous Stamps we have a wonderful range of stamps designed for us by Francoise Read and Jane Gill. We also scour the world for new and innovative products for the crafty card maker, and have a great range of punches and tools of the trade, to find stockists in your area or to see the range visit the website www.woodware.co.uk.

Our design team are playing along with the challenge so check out our blog, which is there for inspiration at www.woodware.co.uk/blog.

Monday, September 7, 2015

Halloween Fun with Graphic 45 Rare Oddities!!

I made this shadowbox assemblage for Halloween decor and I just love it!

It was so much fun making this that I cannot wait to do a Christmas one next!!

 I used a Tim Holtz stamp for the framed picture because I discovered that it looks almost exactly like the skeleton..creepy...
  This skull has lights but they are very hard to capture in a picture unfortunately.


Kitties dont like spiders either!! lol

The big spider behind this web glows in the dark and looks quite scary...


 I would like to enter this in the following challenges:
Rhedd's Creative Spirit - Anything Goes
Altered Eclectics - Anything Goes
Haunted Design House- The Nights are drawing in

Saturday, September 5, 2015

Art Shrine...Just Fly

The following is how I made my art shrine for our September challenge at The Mirror Crack'd


I started out with a bare wood basic frame from a local craft store and coated it with white gesso and let dry.

I then used various colors of Distress paints as a background


Once I liked the resulting background I added texture 
paste through a stencil (Dylusions)


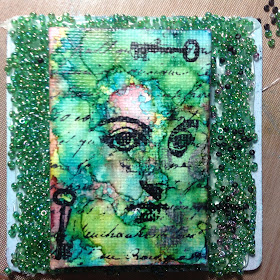
while allowing my texture paste to dry I alcohol inked a mini canvas for the center of my frame

I then stamped my images with Jet black archival ink adhered to backing and then surrounded it with mini seed beads in iridescent green and blue colors.


Now that my texture paste was dry,  I used a text stamp over the entire frame in segments, stamped an antique key and added an angel I previously alcohol inked and a butterfly painted in white gesso over gold. I added a coat of glue and seal to brighten the colors as well as blend them to make a seal.

I then put the backing into it's place and filled in the areas around the tiny canvas with more seed beads and sealed with a clear mod podge paste.

I made some springys with gold soft wire and placed them in the frame for a 3-D affect. I added wings to my painted angel as well as a bird, rose and antique key (from my hoards of stash). My finishing touches were the Artful coin and the chit chat stickers that read use your wings, dont forget to fly.
I hope you have enjoyed this project and it inspires you to get messy and bring your own work of art to our September challenge at The Mirror Crack'd!!

I would also like to enter my shrine in the following challenges:


Thursday, September 3, 2015

TH 12 Tags of 2015..September

I used the tutorial for my September tag. My only change is my stamp choice. I love this tag!


Monday, August 24, 2015

Tim Holtz 12 Tags of 2015- August

For this months tag I chose to pay tribute to my all time favorite artist Salvador Dali. His work inspires and amazes me.


Using Tim's Adventure words Sizzix thinlits dies, I chose the words and cut them out of #8 Tag. I saved the punched out letters to use for other projects. I adhered this to the background using Multi Medium Matte and removed the excess with a paper towel.
Dali's works show many recurrences that reference things one of these is the moth and so I chose to use this paper as my background. It is from TH Wallflower paper.

After applying white gesso to the tag and quickly wiping off the excess with a paper towel, I used the above Distress inks directly on tag and then applied multi medium matte blending the colors to create this cool background!
I took letters from those punched out above to spell his name and applied Black Soot Distress Paint, and applied with multi medium matte on front and back. I did not have the stamp Tim used so I chose a french lettering background stamp from Wendy Vecchi. I adhered various ephemera that played to Dali such as Paris and New York being places he lived and worked. Using Black Soot Distress marker I drew a heavy line over the dried multi medium matte and rubbed around with my fingers to create the shadowing effect.
 I added a cut out signature Dali melted clock that was first adhered to heavy card stock the same way the photo was treated. I then used used distress ink in Tarnished Brass to splatter here and there.
I added the quote using small talk stickers. I thought these words were very Dali. I used Distress paint in black soot with my fingers rubbing around all outside edges to create that grungy look.

I then finished my tag with a rose embellishment painted with Barn Door Distress Paint to symbolize another of my fave paintings of his "Meditative Rose". I really enjoyed doing this one and am happy with the results.


Tuesday, August 4, 2015

Mixed Media Mask

I am very excited to share this as my first piece as part of the Design Team for The Mirror Crack'd challenge blog. It is such an honor to be asked to join a team full of wonderfully inspiring, and talented individuals! I look forward to being a part of this team and sharing my creations.
The August challenge is "Masks" which can be either a  mask such as mine here or a traditional masking technique. However you would like to interpret it please head over to the blog and share your creations!


For this project I started with a cardboard mask found at my local craft store.I painted the entire thing with a coat of white gesso and let it dry. I cut the mask in two pieces in the shape I liked. I then began building up this side using stencils and texture paste. I used my hot glue gun to add real seashells and sand as well as some beads. Once I achieved the look I wanted I then started layering the "corroded" side with different acrylic paints in greens, blues and browns. I also used distress spray walnut stain and water, as well as Dylusions sprays in Dirty Martini,Poisoned Jade and Melted Chocolate colors. I allowed everything to dry completely (overnight). I apologize but I got carried away with this creation and forgot to take pics along the way!


I placed the two pieces back together slightly overlapping the "corroded" side on top of the blank to narrow and distort the face a bit. I painted the blank side in a copper acrylic and let it dry.

I applied an embossing medium through stencil and silver puff embossing powder to create the design on copper side. Using a detail paint brush I went back over the embossed areas that were misplaced with the same copper acrylic paint. Once this was dry I adhered my jewels and pearls with glue, added a silver dragonfly and voila!

I really enjoyed creating this piece. I was inspired by undersea treasure hunters and all the beautiful things they find under years of sediment from the sea.
I hope you enjoyed this creation and that it has inspired you to head over to the Mirror Crack'd and check out what the amazing Design Team has created and encourages you to submit your own creation!
For the August "Masks" challenge We are thrilled to be sponsored by
With a prize of £12.00 to spend at your favourite Woodware Stockist, either in store or on line.
 
Woodware are a Yorkshire based family owned business, as well as distributing Dreamweaver Stencils and Stampendous Stamps we have a wonderful range of stamps designed for us by Francoise Read and Jane Gill. We also scour the world for new and innovative products for the crafty card maker, and have a great range of punches and tools of the trade, to find stockists in your area or to see the range visit the websitewww.woodware.co.uk.http://www.woodware.co.uk/


I am also entering this project in the Anything But Cute challenge this month.


I would also like to enter my project in the following:
Rhedd's Creative Spirit : Anything Goes
Altered Eclectics: Anything Goes

Wednesday, July 29, 2015

Fanciful Fairy Tag

I have been busy lately experimenting with my newest passion of mixed media! I am having a blast seeing these projects come together and want to share!


For this  tag I used several techniques and several mediums.
The Background: Tim Holtz tissue tape I used for a resist technique and then applied several colors of his distress stains to my craft sheet. I then swiped my tag through the colors slowly and dried with heat tool. The Fairy was stamped with black Staz-on ink and then heat embossed with glossy black embossing powder. I then applied embossing paste through a stencil and sprinkled with silver embossing powder to get that puffed up look. added some embellishments from stash and a triple bow and voila!
I would like to enter this tag in the frillie and Funky blog challenge "Things with Wings"