Pages

Friday, April 27, 2018

To The Beach Folio for Tutti Designs Dies

Hello! Jenn here today, sharing with you this fun folio I created using the newly released dies from Tutti Designs along with the Seafarer paper collection from Authentique!

For my fun beach folio, I have used three of the 11 newly released beach themed dies from Tutti

I used dies from the Tutti 414 - Dotted Nesting Rectangles set as well
I also used
Distress Ink Fired Brick and Stormy Sky
Distress Pain Picket Fence
Adhesive tape runner
Glue stick
Foam adhesive
Jute
Ribbon
Flowers
Navy cardstock
Medium weight chipboard
All of the designer papers, cutouts, and sticker elements are from Authentique's Seafarer Collection


This folio card started as a base in which I used a tutorial by Kathy Wright Clement. Kathy has some great tutorials for fun folds and folios on her YouTube channel HERE.
Once my base was built, I added lots of fun embellishments, cut-outs, sentiments, and journaling cards. I added many elements on the pages to allow for pictures to easily be added as well. Please head over to the Tutti Designs blog for a picture walkthrough of this fun folio HERE.!


Once you build a base for a fun fold card or folio such as this, there are endless possibilities to what you can create!
Thanks so much for viewing my post today!
For your convenience, here are all the Tutti Designs quick links you will need:


Until next time! Happy crafting!!
Jenn


Thursday, April 19, 2018

Love Is All You Need Card for Tutti Designs Dies

Hello there, Jenn here today sharing another adorable card made with the amazing Tutti Designs Dies! This card was so much fun! I used Bo Bunny's Garden Party Paper Collection.
The Tutti Design Dies Used here:
Dotted Nesting Rectangles
This set comes with 8 different sizes! I have used three for this card.

For this card I also used the following supplies and tools:
Die Cut Machine
Scissors
Adhesive foam Squares
Glue stick
Tape runner
Distress Ink in Vintage Photo (for inking paper edges)
Green and black cardstock
5X6 1/2" card base
Flower
You can also create your own card base using a 8 1/2" X 11" sheet of heavy black cardstock.
Cut it to 10" X 6 1/2" Place on a scoring pad lengthwise (10") and score at 5 fold and burnish.


Cuts needed for this card:
Die-Cuts
3.875" X 2.625" rectangle 1 from black cardstock 1 from patterned
3.5" X 2.25" rectangle - Sentiment cut-out (front)
4.25" X 3" rectangle 1 from black cardstock, 1 from patterned
Other Cuts
2 - 6" X 4 1/2" - green cardstock for inside and 1 for front
2 strips of black cardstock 4 1/2" X 1 1/4"
2 strips of patterned 4 1/4" X 1"
(these are for the top and bottom panels on the front)
Fussy Cuts
Mason Jar, Flowers, 2 potted succulents all from designer paper collection

Ink the edges of the pieces shown below:


Assemble the card as follows:
Start with the inside: Place green panel down using tape runner gun. Add the black die-cut rectangle and layer the die-cut lines on top. Add one of the fussy cut potted plants as an accent.

On to the front!
Place the green cardstock panel down with a tape runner. Using a glue stick adhere the patterned cut outstrips to the black strips and then onto the top and bottom of the card front. Layer the large die cut patterned rectangle with the remaining black die cut rectangle using glue stick. Place foam adhesive squares to the back of the die cut sentiment and layer on top.
Add a flower embellishment, fussy cuts, and any other elements you wish and now you have an adorable card to give to a friend!
Here is a closer view of the amazing dotted detail these dies give to your cards.

Another view of the entire completed card!

Thanks so much for visiting and viewing my post today!

For your convenience, here are all the Tutti Designs quick links you will need:


Until next time! Happy crafting!!
Jenn


Upcycled Cherub Bottle with Delight™ from Creative Paperclay®


Hello Creative friends! Today on the Creative Paperclay® blog I am sharing how I upcycled this ordinary bottle using Delight™ air dry modeling compound from Creative Paperclay®!
For all of the details and supply list head over to their blog by clicking the picture below.

 The colors used on this project are from Colorique by Lisa Marie Jimenez 


Here is a view of the bottle as it began and some close-ups as well.


Thanks for visiting my blog!
Stay Creative!
Jenn

Wednesday, April 11, 2018

Mother's Day Card for Tutti Designs Dies


Hi there and thanks for visiting my blog! Today I am up at the Tutti Designs Dies Blog sharing how I made this beautiful Mother's Day card! Also an addition to my set of Children's Hour by Graphic 45 cards!
For all the details on how I made this and what you need to make head over to the Tutti Designs blog!


Thanks again for visiting! Stay Crafty!!
xxJenn

Tuesday, April 10, 2018

Timeless for Blank Page Muse

Timeless


It is time for another fun challenge over at the Blank Page Muse Stamps blog! This month the theme is black and white plus one. This was an easy choice for me because purple is my favorite color.
For all the details on the challenge and to see the rest of the teams amazing creations click on the picture link below!!
For my "Timeless" project I used the following Blank Page Muse stamps
Also available at Blank Page Muse are the amazing Baked Textures from Seth Apter! I used the Rocky Road.

Other Supplies:
Small plaque
paper clay molded flowers
paper flowers
Art Alchemy Opal Magic paint in violet-green
Black gesso
White Acrylic Paint
Black Archival Inkpad
wooden oval label
paperclay molded clock
white cardstock
chipboard
cardboard scraps
hot glue
stencil
Texture paste 
Tape runner
Hot glue and a glue gun
purple spray ink
White inkpad
clear embossing ink
clear embossing powder

Here is how I created mine:
Start with the plaque prep. Add some texture by stenciling with texture paste and let that dry.Coat with black gesso and allow to dry completely. Use white ink to do some random stamping (Correspondence script stamp). Add some splatters of watered down white acrylic paint. Add some baked texture in random areas including the edges using embossing ink. Heat set with a heat tool and set aside.

Next prep the dragonflies and other stamps. Use black archival ink to stamp two dragonflies. Coat both with clear embossing powder and heat set. Spray one with a purple ink spray. Set them aside to dry. Stamp the others from the Fairies and Blossoms stamps and clear emboss these as well.

Adhere the purple dragonfly stamped image to a piece of medium chipboard and fussy cut. Fussy cut all of the other stamped images as well.
Start adhering molded paperclay flowers and clock to the plaque. Coat them with black gesso and once they are dry add the purple using Art Alchemy Opal Magic paint.

Paint the small wooden label white and ink the edges in black archival ink using a sponge applicator. Add a sentiment sticker and adhere to the top of the plaque.

To add dimension, add cardboard scraps stacked on the back of the dragonfly as shown below before placing on the plaque. Layer the black and white stamped dragonfly on top of the purple one by adding a strip of adhesive or glue to just the middle and then slightly bend the wings to show the purple below.


Finish it off by adding white paper flowers and some more splatters of watered down white acrylic paint.
Here are a few close-ups showing all of the great detail and texture.


Thanks so much for viewing my blog today! I hope that you enjoyed my project and that you will join in the fun challenge at The Blank Page Muse Stamps!!

For many more beautiful stamps head to the Blank Page Muse Online Store!

Until next time! Happy Creating!
Jenn


Saturday, April 7, 2018

Graphic 45 2018 Brand Ambassador Audition

I love to use Graphic 45 papers for my cards. The colors, quality, and versatility are unmatched. They have so many coordinating parts in their collections that lend themselves so well for those who love to fussy cut like myself. I find that by combining die-cuts and fussy cutting, I am able to bring to life the story within these beautiful papers.
To Create the Easter Card the following supplies were used:
5X7 Card Base
Graphic 45 Designer papers from Children's Hour and Time To Flourish
Yellow cardstock
Xyron tape runner
Deco Art Paints (flowers)
Prima Flowers
Glue
Foam adhesive dots and squares
Nuvo Crystal Drops - Ivory Seashell
Tutti Designs Dies


Die-Cuts
4" Cross Stitched Oval -Front picture
2 1/4" Cross Stitched Oval -cut 3 from 3 solid colors in the designer paper collection (eggs)
3" Dotted Rectangle - Easter Sentiment on Front - from designer paper cut-outs
4 1/2" Dotted Rectangle - cut 2 from two patterns of designer papers (inside)

Other cuts
From patterned designer papers cut the following
front panel bottom layer- 4 3/4" x 6 3/4"
second layer - 4 1/2" x 6 1/2"
Cut strips of patterned for various places to embellish the card
Fussy cut Fairies
yellow cardstock - 4 3/4" X 6 3/4"

Build the card
Inside - Place yellow cardstock as the background layer
place one of the die cut rectangles on top and one on bottom
Add a strip of the patterned border in between as shown.
Add one of the die cut oval eggs, fussy cut stamp, and a cut-out sentiment from designer papers.

Front of card
Adhere the layers to the front of the card including the negative from picture die cut into the oval.
Use foam adhesive squares to lift up the oval die-cut portion and place on top
Add flowers, die-cut oval eggs, sentiment, and fussy cut fairies.
I added some sparkle with Nuvo Crystal Drops, DecoArt Pearlizing Medium, and a green flower jewel.
Here is the finished card at an angle showing the dimensions and layers.

Here are a few close-ups showing the details


Here is another fun card using the Children's Hour collection! I plan to make one from every theme included in this beautiful collection!


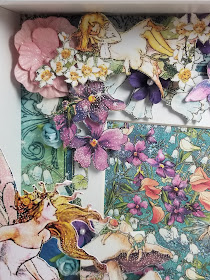
For my second project, I have created a beautiful Fairy Garden shadow box using the Gorgeous Fairy Dust collection! I was so excited when this collection was released and knew I wanted to do something special with it. This was a creation inspired by my newly born granddaughter, Olyvia and is meant to hold her picture inside.

I have many photos below to show the amazing detail and dimension of my shadowbox. I really loved creating this!


Thanks so much for viewing my audition projects!